DIY Turkish Hammam at Home invites you to bring the steam, ritual, and serenity of a traditional Turkish bath into your own bathroom. This subtle home steam bath blends heat, humidity, cleansing rituals, and mindful self-care into a manageable, affordable practice. With simple gear, safety steps, and a calming ambiance, you can craft an authentic Turkish bath experience at home. In this introductory guide, you’ll discover steps to set up a DIY hammam steam room that respects space, humidity, and personal limits while delivering soothing results. From exfoliation rituals to post-session moisturization, this approach highlights hammam benefits at home through a mindful, sensory routine.
Think of the experience as a Turkish bath-inspired steam ritual you can adapt to a home setting. Rather than a strict replica, it’s a warm, humidity-rich routine that centers on comfort, routine, and mindful breathing. LSI-friendly terms like fragrant steam session, exfoliation ritual, and post-cleanse moisture care help connect the idea to related topics without repeating the exact phrase. Framing it as a holistic self-care practice—emphasizing mood, atmosphere, and skin health—aligns with searches for home spa, wellness routines, and DIY skincare. This approach invites you to explore home spa projects, heritage-inspired bathing practices, and practical equipment choices that suit small spaces.
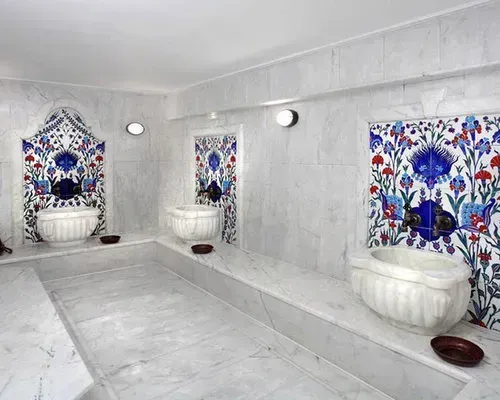
DIY Turkish Hammam at Home: Setting the Stage for an Authentic Steam Bath Experience
Creating your own oasis begins with a clear vision of steam, warmth, and calm. A DIY Turkish Hammam at Home is more than a heat session—it’s a ritual that blends heat, humidity, cleansing, and mindful self-care to deliver an authentic Turkish bath experience in your own bathroom. By focusing on the essential elements rather than replicating every detail of a grand hammam, you can craft a serene, spa-like atmosphere at home.
To set the stage, aim for consistent steam and humidity, subdued lighting, and a quiet space free from interruptions. The goal is to recreate the hammam sequence—steam and warmth, gentle cleansing, soap lather, and a final rinse—while prioritizing safety and accessibility in a home environment.
Designing a Safe and Comfortable Home Steam Bath Environment
Ventilation matters in a compact bathroom: ensure good airflow to reduce dampness, protect surfaces, and support your comfort during a safe home steam bath.
Plan a moisture-friendly layout with non-slip mats, washable surfaces, and a simple enclosure to trap steam without soaking every corner of the room. Even a DIY hammam steam room can feel indulgent when paired with a timer and thoughtful placement of gear.
Gear that Makes or Breaks Your DIY Hammam Steam Room
Gear choices set the tone for your space: a portable steamer, a warm-setting humidifier, or a compact bathroom steam generator can create the humidity you need for a restful session.
Stock skin-friendly cleansers like savon noir or mild olive oil-based soap, plus a kese mitt or exfoliating glove. Add a few drops of cedarwood, eucalyptus, or lavender oil sparingly to enhance the ambiance without overloading the steam.
A Step-by-Step Ritual for an Immersive DIY Hammam Experience
In practice, begin by warming the space and bringing up humidity to a comfortable level. If you’re using a steam source, run it for a few minutes, then maintain a steady humidity to prime the skin for cleansing.
Proceed with cleansing and exfoliation: rinse with warm water, apply savon noir or a mild soap to damp skin, then exfoliate with a kese mitt in gentle, circular motions. Finish with a light soap lather, rinse, and pat the skin dry before applying a nourishing oil.
Skin, Exfoliation, and Care: Hammam Benefits at Home
Exfoliation is central to the hammam ritual and helps remove dead skin, improve texture, and boost product absorption—these are hammam benefits at home.
After the session, moisturize with a light oil or balm to seal in moisture, supporting hydration and a supple, balanced complexion.
Maintenance, Safety, and Long-Term Enjoyment of Your DIY Turkish Hammam at Home
Maintenance and cleanliness keep your routine enjoyable: rinse, dry, and moisturize after each session; wipe down surfaces, clean tools, and store gear properly to prevent mildew and odors in your bathroom.
Safety and comfort come from mindful practice: stay hydrated, limit sessions to 10–20 minutes, monitor for dizziness or redness, and adjust steam levels to suit your space and body. With steady care, your home Turkish hammam can become a cherished wellness habit.
Frequently Asked Questions
What is a DIY Turkish Hammam at Home and how can I start recreating the authentic Turkish bath experience?
A DIY Turkish Hammam at Home is a personal ritual that recreates the core elements of a Turkish bath—steam, heat, cleansing, and mindful self-care—inside your own bathroom. By focusing on a steady home steam bath setup, gentle cleansing with savon noir or olive oil soap, a soft exfoliation, and a calming ambiance, you can achieve an authentic Turkish bath experience without a professional hammam.
What gear do I need for a DIY hammam steam room in a home bathroom?
Essential gear includes a reliable steam source (portable steamer, humidifier on a warm setting, or a compact steam generator), a non-slip mat, a kese mitt or exfoliating glove, a mild soap such as savon noir or olive oil-based soap, soft towels, and a simple enclosure (shower curtain or tent) to trap steam. Prioritize safety by using GFCI outlets and keeping electrical devices away from water.
How long should a typical home steam bath session last, and how often should I practice as part of a DIY Turkish Hammam at Home?
Begin with 10–20 minutes per session to enjoy comfortable warmth without overdoing it, and limit steam sessions to a few days per week. Hydrate before and after, listen to your body, and gradually increase or adjust duration as you become more comfortable. Regular practice can contribute to skincare and relaxation, aligning with hammam benefits at home.
What safety tips are essential when creating a DIY Turkish Hammam at Home?
Prioritize ventilation to prevent excessive humidity and mold, use non-slip surfaces, and protect wooden or sensitive surfaces from moisture. Avoid wet-area electrical hazards by using properly insulated devices and GFCI outlets, and unplug equipment when not in use. If you feel dizzy, lightheaded, or unwell, exit the space and cool down.
How can I recreate an authentic Turkish bath experience at home on a budget?
Focus on the ritual rather than pricey gear: build a calm space with soft lighting, use a kese mitt, savon noir or olive oil-based soap, and a simple steam setup (shower steam or a compact humidifier). Small touches like terracotta or ceramic bowls for rinsing and a bench or stool can evoke the look of a Turkish bath, while still delivering hammam benefits at home.
What is a simple step-by-step routine for a DIY hammam session at home?
1) Prep and heat the space to create steady steam. 2) Rinse with warm water and apply savon noir or mild olive oil soap. 3) Sit or stand in the steam for 6–12 minutes. 4) Exfoliate gently with a kese mitt in circular motions. 5) Rinse and apply a light soap or olive oil, then rinse again. 6) Pat dry and apply a moisturizer or light oil. 7) Optional: finish with a small amount of almond or argan oil to seal in moisture.
| Aspect | Key Points |
|---|---|
| What makes a Turkish Hammam unique? | Steam bath emphasizing heat, humidity, and ritual cleansing; calm ceremonial atmosphere; sequence: steam → exfoliation → soap lather → rinse. |
| Safety considerations | Ventilation, moisture management, electrical safety, hydration and timing, health considerations (pregnant, cardiovascular, respiratory). |
| Planning your at-home hammam | No dedicated spa room needed; bathroom setup works with adjustments. Steam sources include portable steamer, humidifier, or compact steam generator; manage heat/moisture with a tent or shower curtain; essentials: towels, non-slip mat, kese mitt, savon noir or olive oil-based soap, moisturizer; ambiance: essential oils in small amounts, soft lighting. |
| Step-by-step guide highlights | Prep heat up; Gentle cleansing; Steam and soak (6–12 minutes); Exfoliation with kese mitt; Lather and cleanse; Rinse and nourish; Optional oil finish. |
| Authenticity touches & gear | Kese mitt care; savon noir alternatives; budget-friendly traditional elements: terracotta/ceramic dishes, small bench. |
| Benefits | Relaxation and stress relief; Skin health and exfoliation; Improved circulation; Hydration and balance when done thoughtfully. |
| Maintenance & safety reminders | Aftercare rinse, pat dry, moisturize; Cleaning schedule; Mold prevention; Equipment care and safety with steam devices. |
| Common mistakes to avoid | Overheating; Poor ventilation; Slippery surfaces; Harsh products during steam; avoid excessive heat and duration. |
Summary
DIY Turkish Hammam at Home offers a doorway into Istanbul’s tranquil steam culture right in your bathroom. This descriptive conclusion emphasizes creating a mindful, spa-like routine that centers safety, atmosphere, and gentle care. Start with a safe setup and a modest steam session, then gradually refine your practice with a simple exfoliation and hydration ritual that fits your space, budget, and comfort. By prioritizing authentic rituals, calm ambiance, and skin-friendly steps, you can experience relaxation, refreshed skin, and a balanced body—right in your own home. With patience and consistency, your at‑home hammam becomes a personal retreat that supports wellbeing and renewal.