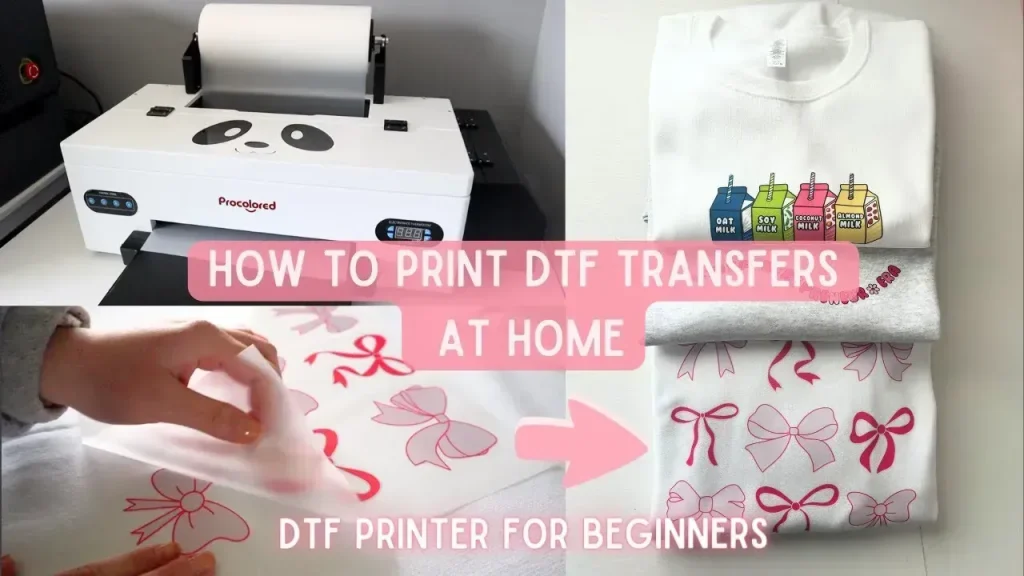
DIY DTF transfers have exploded in popularity as an accessible way to produce vibrant, durable graphics on garments from the comfort of a home studio. If you’re tired of outsourcing every print or paying per-item fees, a step-by-step setup for home printers can unlock a world of customization. This guide explains what DIY DTF transfers are, what you need to get started, and how to handle DTF printer setup and printer calibration for DTF to ensure consistent results. By the end, you’ll understand the core steps—from choosing the right DTF transfer paper to mastering heat press settings for DTF—so you can design, print, and press with confidence. With this foundation, you’ll be ready to experiment and scale your home projects with durable, professional-looking outcomes.
Viewed from a broader perspective, this at-home fabric printing approach is best described as a film-to-garment transfer workflow, a modern evolution of textile decoration. Instead of screen printing or iron-on vinyl, hobbyists work with a printable film, an adhesive primer, and a powder finish to bond designs to cotton, polyester, and blends. In practice, beginners set up their printers, calibrate colors, and manage heat and pressure to achieve durable, wash-fast results with vibrant color. As you explore this method, you’ll encounter terms like direct-to-film printing, film-based transfer media, and textile imagery produced at home on a small scale.
Understanding DIY DTF Transfers: What They Are and Why They Matter
DIY DTF transfers define a home-friendly method for moving vibrant, durable images onto fabrics by printing onto a film, applying a powder adhesive, and then using heat and pressure to bond the design. The process relies on components like DTF transfer paper, DTF inks, and a compatible printer to create a flexible, full-color image that can be pressed onto a wide range of garments. When done correctly, the result is a smooth gradient, strong wash-fastness, and the flexibility to produce small runs without outsourcing. This makes DIY DTF transfers an appealing option for crafters, small studios, and anyone looking to customize apparel at home. “DTF transfer paper” and the right inks are the backbone of this workflow, enabling reliable transfer from screen to fabric with consistent results.
Compared with traditional screen printing or heat transfer vinyl (HTV), DIY DTF transfers offer a broader color gamut, fewer setup steps for small batches, and a faster turnaround for on-demand production. The approach eliminates the need for screens or complex weeding, letting you print an inverted design onto a film, apply adhesive, and press onto fabric. The result is flexibility for designs with rich color depth, subtle shading, and easy adaptation to different garment colors. Understanding this distinction helps home crafters leverage the full potential of DTF projects, keeping workflows simple while preserving professional-grade finishes.
Building Your Home DTF Toolkit: Essential Tools and Materials
A well-rounded DTF setup starts with the basics: DTF transfer paper, DTF inks, a compatible printer, a heat press, and a light adhesive powder. This combination supports a repeatable workflow from design to finish. In addition, a curing rack, a dust-free workspace, and calibration tools are invaluable for maintaining print quality and minimizing clumps or specks during the adhesive stage. Keeping a dedicated space for DTF work helps sustain consistent results across projects.
When selecting equipment, balance cost, space, and project volume. Look for a printer that can handle transfer films and accommodate the DTF inks you plan to use, while ensuring reliability and stable color output. A solid starting point is a printer that can be calibrated for accurate color reproduction, with a plan for chassis maintenance and nozzle checks to support your long-term goals. All together, these elements form a practical toolkit that keeps your DIY DTF transfers consistently impressive.
Optimizing Your DTF Printer: Calibration, Setup, and Color Management
To achieve faithful designs, focus on printer calibration for DTF: run nozzle checks regularly, align color profiles, and verify that ink flow remains steady across the printhead. A proper DTF printer setup includes installing the correct inks, loading transfer paper correctly, and configuring software to output with matching color profiles. This attention to calibration reduces color drift and helps your designs reproduce with the intended vibrancy and balance.
Color management is essential for gradient-heavy or photographic designs. Build or apply ICC profiles suited to your chosen inks and fabrics, and remember to mirror artwork as needed for dark garments. Regularly test prints on sample materials to confirm that the DTF inks render skin tones, shading, and texture accurately, ensuring your workflow remains predictable from screen to fabric.
From Paper to Print: Printing with DTF Transfer Paper and Inks
Printing starts with preparing the artwork and selecting the correct print settings to maximize color density and edge sharpness. Use DTF transfer paper designed for adhesive bonding and verify that you’re printing with the right nozzle settings and ink configuration. When you pair high-quality DTF inks with the transfer paper, you’ll achieve strong color payoff and better wash durability, especially on fabrics that vary in texture and color.
After printing, the design enters the adhesive stage, where a light powder is dusted onto the surface to create a bonding layer. A clean, low-dust environment helps ensure even coverage, and a curing rack aids in consistent drying before heat pressing. With careful handling, you’ll minimize dust contamination and preserve print integrity for reliable transfers across projects.
Heat Press Mastery: Heat Press Settings for DTF and Pressing Techniques
Achieving durable transfers hinges on effective heat press settings for DTF. This includes selecting appropriate temperature, pressing duration, and even pressure across the garment. The right combination depends on fabric type, ink density, and the adhesive used, so consult your material guidelines and perform test presses on similar textiles before committing to larger runs. Focusing on consistent pressure and uniform contact helps prevent ghosting and edge artifacts.
Beyond the basics, refine your technique through controlled trials on different fabrics and garment weights. Use accurate timing and stable platen pressure, then monitor the cooling phase for optimal bonding. A short post-press cure time can improve wash-fastness and durability, ensuring your designs withstand regular wear and laundering while maintaining color fidelity.
Troubleshooting, Maintenance, and Scaling Your DTF Project Workflow
Even with care, issues can arise during DIY DTF transfers. Faded colors or color shifts may indicate a calibration drift or a need to adjust color profiles. Ghosting or misalignment often points to fabric movement or print-to-press registration errors, so using registration marks or a jig can help. Address adhesive issues by reviewing the powdering and curing steps, and ensure you’re using fresh transfer paper and compatible inks for your prints.
Maintaining your equipment is essential as you scale up production. Regularly clean the print head and sensors, store transfer film and powders in a cool, dry place, and run periodic calibration checks to keep ink flow and color accuracy steady. Create a dedicated workspace to minimize dust, inspect your heat press platen for wear, and build templates or workflows that streamline recurring designs for consistent, repeatable DIY DTF transfers.
Frequently Asked Questions
What are DIY DTF transfers and how does DTF transfer paper play a role in the process?
DIY DTF transfers bring the direct-to-film workflow into your home, enabling vibrant designs on fabric using a standard printer and a heat press. DTF transfer paper is the film you print onto; it receives the adhesive primer and powder and becomes the carrier for the final image. Typical steps include printing the design on the transfer paper, applying a light adhesive powder, curing and removing excess powder, then pressing onto the garment with heat and pressure.
How can I set up my printer for DIY DTF transfers and ensure reliable printer calibration for DTF results?
Start with a printer that supports DTF inks and transfer film, install the appropriate DTF inks, and load DTF transfer paper. Run nozzle checks and calibrate your color profile to match your design, then print a test page. When ready, enable any required mirroring for dark fabrics and establish a routine for printer calibration for DTF to keep colors consistent across runs.
What role do DTF inks play in DIY DTF transfers and how do they affect color and durability?
DTF inks, typically pigment-based, provide strong color density and wash-fastness when paired with the right printer and transfer system. They work with DTF transfer paper to produce vibrant, durable images. Use inks recommended for your printer, keep them fresh, and periodically calibrate color to prevent shifts and preserve color fidelity.
What are effective heat press settings for DTF in DIY transfers to maximize durability?
Heat press settings depend on the fabric and adhesive used. Start with the manufacturer’s guidelines for the adhesive and garment type, pre-press the fabric, then apply even pressure for the recommended dwell time. Adjust temperature, time, and pressure according to fabric weight and test on a sample garment to avoid scorching or edge cracking.
How do I calibrate my printer for DTF transfers when using DTF transfer paper to ensure color accuracy?
Perform regular nozzle checks and run color calibration with ICC profiles that match your inks and paper. Print test patches on both plain media and fabrics similar to your final project to verify color accuracy, then refine calibration until the printed output matches your design intent on the transfer paper.
What are common DIY DTF transfer issues and how can I troubleshoot them during a DTF printer setup?
Common issues include faded colors, ghosting, misalignment, white-layer problems on dark fabrics, and poor adhesion. Troubleshoot by rechecking printer calibration for DTF, ensuring flat and stable garment placement with registration aids, confirming adhesive powder application and curing, validating heat/pressure settings for the fabric, and verifying the transfer paper’s shelf life and ink flow.
| Key Topic | Summary |
|---|---|
| What are DIY DTF transfers? | Printing a design onto film, applying adhesive, then transferring with heat to garments from a home setup; enables on-demand, customized apparel. |
| Why they matter | Offer flexibility, broad color gamut, and fewer setup hurdles for small runs; no screens or vinyl weeding; scalable for home-based production. |
| What you’ll need | DTF transfer paper, DTF inks, a compatible printer, heat press, light adhesive powder, curing rack, dust-free workspace, and calibration tools. |
| Choosing the right setup | Balance cost, space, and project size; pick a printer that supports wide-format media and reliable color output; ensure printer compatibility with DTF workflow and good calibration. |
| Setting up printer (step-by-step) | Prepare workspace; install inks/media; run nozzle check; calibrate color; configure print settings; apply adhesive; cure; test press on a sample. |
| Repeatable workflow | Create a predictable sequence: prepare artwork, mirror for dark fabrics, print with correct profile, apply adhesive, cure, align/press, peel/cool, post-press cure, and quality check. |
| Fabric types & color management | Aim for consistent color across fabrics with ICC profiles, test on fabric weights, tailor heat/pressure, and run small tests when scaling. |
| Troubleshooting | Faded colors/ghosting/peel issues/cracking: recalibrate color, ensure even adhesion, verify bake time/temperature, and test on similar fabric. |
| Maintenance tips | Clean print head, store films/powders properly, periodic calibration, dedicated workspace, inspect heat press for even pressure. |
| Advanced tips | Improve color management with custom ICC profiles, batch-print templates, experiment with fabrics, and consider post-press finishing. |
Summary
Conclusion: DIY DTF transfers empower home crafters to produce high-quality, full-color graphics with a home printer setup. By understanding core components—DTF transfer paper, DTF inks, a compatible printer, and a reliable heat press—and following a repeatable workflow, you can achieve consistent, durable results. Focus on printer calibration, color management, and proper adhesive processing to reduce common issues and improve performance. With patience, you’ll move from experiments to reliable production of customized apparel and accessories, unlocking creativity and cost savings once out of reach for the home crafter. As you gain experience, you’ll refine your setup, master heat and pressure nuances, and expand your range of DIY DTF transfers to include more fabrics and designs.